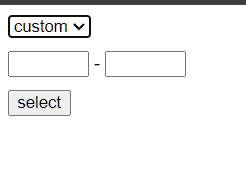
你可以在以下链接查看一个实现示例:https://codepen.io/Jonathan-Rodrigues-Cardoso/pen/WNmQKGo
在这个示例中,我们创建了一个下拉选择框和两个输入框,当用户在下拉菜单中选择“custom”选项时,两个输入框会变为可用状态,允许用户自定义范围。当点击“select”按钮后,根据用户的选择或输入,将获取并显示选定的范围。
HTML部分:
<div id="container">
<select id="select-range" onchange="onChangeSelect(this)">
<option>0-9</option>
<option>10-19</option>
<option>20-29</option>
<option>custom</option>
</select>
<div>
<input id="input-from" type="number" name="min" min="0" max="30" disabled />
-
<input id="input-to" type="number" name="max" min="0" max="30" disabled />
</div>
<button onclick="onSelect()">select</button>
</div>
JavaScript部分:
const onChangeSelect = (event) => {
if (event.value === "custom") {
document.getElementById("input-to").disabled = false;
document.getElementById("input-from").disabled = false;
} else {
document.getElementById("input-to").disabled = true;
document.getElementById("input-from").disabled = true;
}
};
const onSelect = () => {
const selectRange = document.getElementById("select-range").value;
let range = [];
if (selectRange === "custom") {
const inputTo = document.getElementById("input-to").value;
const inputFrom = document.getElementById("input-from").value;
range[0] = inputFrom;
range[1] = inputTo;
} else {
range = selectRange.split("-");
}
alert(`range: ${range[0]} - ${range[1]}`);
// 在这里可以根据范围执行相应的操作,例如发送到服务器
};
样式部分(CSS):
#container {
display: flex;
flex-direction: column;
align-items: start;
gap: 10px;
}
此方案实现了你所期望的效果,如截图所示: